

How to Clone Raspberry Pi SD Card on Windows, Linux and macOS
The Raspberry Pi is the ultimate tinkerer's toy. Most of its users love to experiment and break working installations in the procedure. However, despite how much fun it is, anybody loves to have a working baseline configuration that that they can return to after the experiment is over.
Another common scenario is let's say, you just got to know about a cool new Raspberry Pi-based project or Linux distro, and you are dying to effort information technology out. Trouble is, you lot only have one micro SD card, and already accept a working installation on information technology that y'all practise not want to lose.
In both the to a higher place scenarios, it is helpful to have an exact, bit-by-bit identical backup of your working Raspberry Pi installation. Then today, nosotros will learn how to clone or backup the Raspberry Pi micro SD card to an image file, and restore the paradigm afterward we are done experimenting. Nosotros will explain how to practice it on Windows, Linux, and finally macOS.
Note : This method will create an image file exactly the size of the SD carte du jour'south full capacity. For instance, if you have a xvi GB SD card, the resulting image file will also be 16 GB, no affair how much infinite your installation is actually using. There is a method to shrink the image size, just it works only on Linux, and nosotros volition exist explaining it later in the tutorial.
Windows Instructions
Backup Raspberry Pi SD Card
ane. Insert the micro SD bill of fare that y'all desire to clone in your PC using a USB or congenital-in card reader.
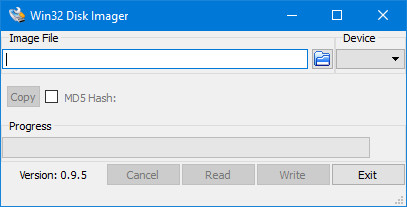
2. Download and install Win32DiskImager, and run it. You will meet a screen similar this:
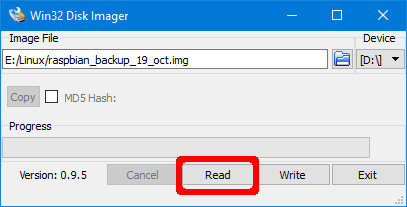
3. Under theDevice section in the top right corner, select the drive of your SD card. Information technology is D: in my case. Now click on the folder icon to its left, and cull a location and filename where the image file volition exist saved. I chose the file name raspbian_backup_19_oct.img. You can cull whichever filename you lot similar, but it is preferable to have an .img extension. One time done, click on the Read push.
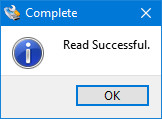
four. This will make a clone of the SD card in the location you specified. The copying will take a while to complete, then do not turn off or put your PC to sleep during this flow. One time it is done, you will go a "Read Successful" bulletin.
You are now gratuitous to insert the menu dorsum in your Raspberry Pi and break things or install a new distro. Once you are done playing and desire to restore the backed upwards image, follow the steps in the next department.
Restore Raspberry Pi SD Card
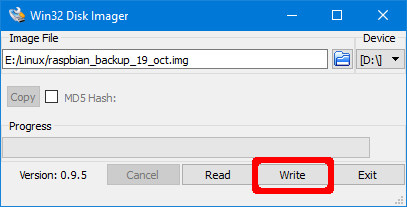
Insert the micro SD carte in your PC, and open Win32DiskImager. Select the prototype file y'all created previously, and the appropriate drive in the Device section. Now, click on the Write push button. The epitome will be saved to the SD carte du jour, exactly how it was, at the fourth dimension you copied information technology.
Again, this process will take a while depending on the size of the SD carte du jour. One time the restore is complete, you tin can remove the card from your PC, and insert information technology dorsum in the Raspberry Pi.
Linux Instructions
Backup Raspberry Pi SD Card
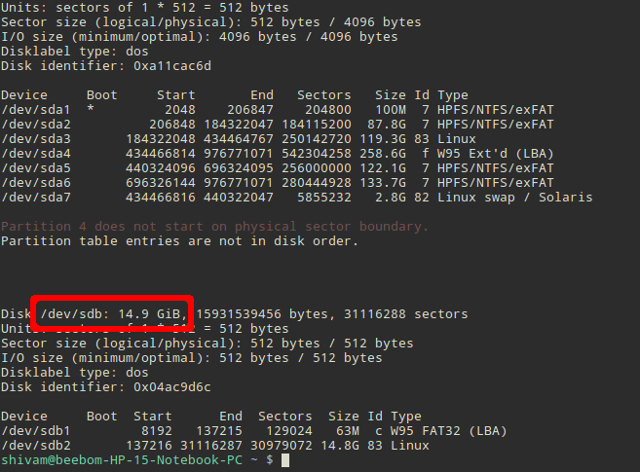
1. Insert the SD bill of fare in your PC using a USB or built-in menu reader. Now open a Terminal window, and enter the command sudo fdisk -l. This will listing all the filesystems nowadays on your organization.
two. Try to observe out the device name of your SD menu. I have a 16GB SD card, and so it is easily identified as the device /dev/sdb which has a size of xiv.9GB. This is because the bodily storage on a device is always slightly lower than advertised. Note down this device name.
iii. Employ the dd command to write the image to your hard disk. For example:
sudo dd if=/dev/sdb of=~/raspbian_backup.img
Here, the if parameter (input file) specifies the file to clone. In my instance, information technology is/dev/sdb, which is my SD card's device name. Replace it with the device name of yours. The of parameter (output file) specifies the file name to write to. I chose raspbian_backup.img in my abode directory.
Notation : Be careful, and double check the parameters before executing the dd command, as entering the wrong parameters here can potentially destroy the data on your drives.
Y'all volition non meet any output from the control until later on the cloning is complete, and that might have a while, depending on the size of your SD carte. Once it is consummate, you volition see an output like the following.

You tin can now remove the SD carte and use information technology in your Pi. Once yous are ready to restore the backed upwardly image, follow the instructions below:
Restore Raspberry Pi SD Card
ane. Insert the SD card in your PC. Before we restore the image, it is of import to make sure that the SD carte du jour'southward partitions are unmounted. To verify this, open the Terminal, and execute the command sudo mount | grep sdb. Here, replace sdb with your SD card's device name.
If you see a bare output, yous practise not need to do anything. If you do come across some mounted partitions, unmount the listed ones. For example:
sudo umount /dev/sdb1 /dev/sdb2 /dev/sdb3 /dev/sdb4
two. Use the dd control to write the image file to the SD card:
sudo dd if=~/raspbian_backup.img of=/dev/sdb
This is like the control nosotros used to make a clone, merely reversed. This time, the input file if is the backup image, while the output file of is the SD card device.
Again, verify, and double-verify the parameters here, as entering the wrong command here will cause permanent information loss.
Once the write is consummate, you lot will come across a confirmation from dd. You lot can then remove the bill of fare from your PC, and insert it back in the Raspberry Pi.
macOS Instructions
Backup Raspberry Pi SD Carte
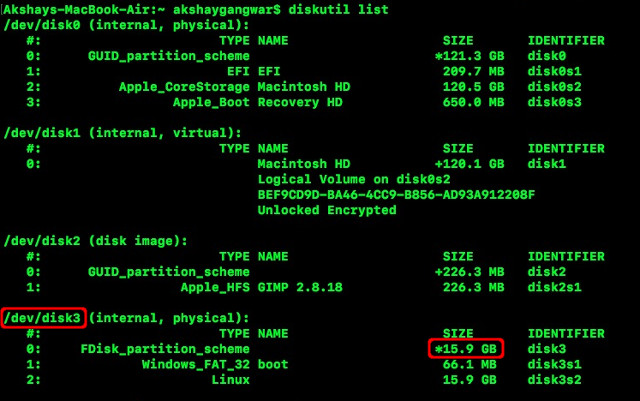
1. Insert the SD carte in your Mac using a USB or built-in carte du jour reader. Now open a Terminal window, and enter the commanddiskutil list. Try to identify the device ID of your SD carte du jour. For example, mine shows up as /dev/disk3.
2. Unmount your SD menu:
diskutil unmountDisk /dev/disk3 Here, supplantdisk3 with the name of your SD card that you identified in step 1.
3. Use the dd control to write the epitome to your difficult disk. For example:
sudo dd if=/dev/disk3 of=~/raspbian_backup.img
Here, theif parameter (input file) specifies the file to clone. In my case, information technology is/dev/disk3, which is my SD card's device name. Replace it with the device proper noun of yours. The of parameter (output file) specifies the file proper name to write to. I chose raspbian_backup.img in my home directory.
Annotation : Exist careful, and double check the parameters before executing the dd control, equally inbound the wrong parameters here can potentially destroy the data on your drives.
You will not meet whatever output from the command until afterwards the cloning is complete, and that might take a while, depending on the size of your SD card. You lot can then remove the SD card and use information technology in your Pi. Once you are ready to restore the backed up image, follow the instructions below:
Restore Raspberry Pi SD Menu
1. Insert the SD card in your Mac. Open a Terminal window, and unmount it using the following control:
diskutil unmountDisk /dev/disk3 Hither, replacedisk3 with the name of your SD that you identified in footstep 1 of the previous section.
ii. Use the dd control to write the image file to the SD card:
sudo dd if=~/raspbian_backup.img of=/dev/disk3
This is similar the command we used to make a clone, but reversed. This time, the input file if is the backup image, while the output file of is the SD menu device.
Once again, verify, and double-verify the parameters here, every bit entering the wrong control hither volition crusade permanent data loss.
Once the write is complete, yous volition come across a confirmation from dd. You lot can and then remove the card from your Mac, and insert information technology back in the Raspberry Pi.
How to Shrink the Cloned Raspberry Pi Prototype (Linux-just)
Every bit mentioned at the starting of the article, these methods create an image file that is equal to the total capacity of the SD menu. For example, cloning an SD carte du jour with a capacity of 32GB volition create an paradigm file of 32 GB, fifty-fifty if only five GB is really in use on the card. This is fine if you but have one or two such images, merely any more than that (especially if you utilize an SSD) volition cause yous to run out of space.
To work around this limitation, we will use PiShrink, a script that automatically shrinks a Pi prototype that volition and so automatically resize to the max size of the SD bill of fare on kicking. This also makes copying the paradigm back onto the SD card much faster.
Unfortunately, this tool is simply available on Linux. If yous exercise non have Linux installed, you can install the latest version of Ubuntu or Linux Mint in a virtual motorcar, and run this script in that location. Here is how to use it:
1. Download the PiShrink script, and get in executable. In a Terminal, enter the following 2 commands:
wget https://raw.githubusercontent.com/Drewsif/PiShrink/master/pishrink.sh chmod +10 ./pishrink.sh
2. Run the script, followed by the proper noun of the image that you lot want to shrink.
sudo ./pishrink.sh ./raspbian_backup.img
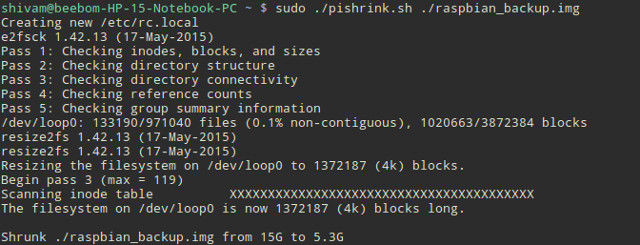
three. The prototype volition then be shrunk. In one case done, you tin can write the shrunk image file to the SD card as mentioned in the methods listed above. For example, on Linux:
sudo dd if=~/raspbian_backup.img of=/dev/sdb
SEE ALSO: How To Run Commands on Raspberry Pi by Email
Clone Raspberry Pi SD Card for Piece of cake Restore
So that is all on cloning aka backing-up and restoring existing Raspberry Pi installations. Never once again volition you have to lose a perfectly working installation of Raspbian OS on Raspberry Pi to try out a new distro or a absurd project. Merely support your installation, tinker around, and restore the paradigm when you are done. Doesn't get any simpler than that.
How did yous similar this method of bankroll upward your Raspberry Pi installations? Got a improve manner? Questions? Comments? Let us know in the comments section below.

Source: https://beebom.com/how-clone-raspberry-pi-sd-card-windows-linux-macos/
Posted by: fryerricated.blogspot.com
0 Response to "How to Clone Raspberry Pi SD Card on Windows, Linux and macOS"
Post a Comment